Sunday 28 September 2014

Unit 03 Ideas and Concepts

Saul Bass Design

In this unit I was introduced to Saul Bass, a man who designed a new type of poster for films, which had made him a legend in the eyes of the industry. Saul Bass' design were so popular that they had revolutionized the way films were shown in posters. Saul Bass created minimalism posters, which would consist of objects that are reconised from a film, for example, the batman symbol.

http://meetinthelobby.com/wp-content/uploads/2011/02/BTTF.jpg
For my attempt to recreate a Saul Bass poster I must understand what it is that makes a Saul Bass poster. So I had done some research on Saul Bass and had created a mood board on some fan made/inspired posters to get a further understanding into the Saul Bass Design. I had found many fan made designs from 'Spartacus' to 'Pulp Fiction'. By creating this mood board. I had found a deeper understanding into how Saul Bass style worked, with it's minimalistic design and simplistic text font, this had allowed me to progress further on with my work. I like creating mood boards because it allows me to get a deeper understanding into the chosen subject and will allow me to build some ideas from my imagination.

https://www.youtube.com/watch?v=cMTq4S3O8cM
I like this title sequence because of how much it is alike the original intro to Game of thrones. It portrays important parts within the story line whilst using the Saul Bass design. The use of Dragons, Wolfs and castles give me the idea that ‘Games of thrones’ is going to be about action packed fighting between animals and men for the struggle for power.  The use of Saul Bass as a minimalist and creative style is also why I like it, as it is easy to take in and to understand. Some of the Saul Bass designs have inspired me on how I made my own Saul Bass Title sequence.


I then began to create my text style for my chosen subject, which was 'Mrs. Doubtfire' until I had changed it to something I had a better understanding of. That subject then became 'Warriors Orochi 3'. As I tried these different type faces I had found that each one would give off a different feel to how the film may be portrayed and had allowed me to contrast and compare for my final 5 designs.


Firstly I believe that objects displayed in the poster is a huge part to the Saul Bass design as it gives of a sense of understand to what the film is about. Secondly I believe that the typeface used also has an effect on how the poster will be perceived. I began to look at minimalistic type faces and experimented with them for my 'Warriors Orochi 3' Design. I looked at fonts on 'www.Dafont.com' and tested the ones that I believed were minimalistic and simple to see if it worked well for my chosen title.


Warriors Orochi 3 Final Typeface
After Finishing creating the type face, I needed to create a mood board in order to generate ideas and give other the overall feeling for the Saul Bass title sequence. I believe that this is a good way to become inspired in creating Saul Bass scenes, as it reminds me about the topic that I had chosen to do.


'Warriors Orochi 3' mood board.

I started creating some objects for my version of Saul Bass' design. Since my chosen title had a lot of important characters in it, I had to create a lot of objects. These objects I had first sketched to get a idea to how the may look when I go to create them and then I later created them using Illustration. I like this method as It allows me to try to make and change ideas before I create and define them in my final version.


Object designs for Warriors Orochi 3.


After creating these objects I had begun testing these objects against different colours and styles as shown below. To do this I had copied a object from my test sheet and then changed the background to a different colour. I had done this to see what effect I could get from the objects placed against different backgrounds. What I had liked about this is that I was able to create new and more ideas simply by moving the objects in several places and applying a few effects.


After all the objects and text fonts had been created, it was time to move onto the frame by frame title sequence planning. For the subject 'Warriors Orochi 3' I had chosen to show some of the most important parts of the game and also important characters as well. It could be agreeable that my chosen frames have signs of repetition, but I believed that this was the best way to show these images. I liked being able to create a story via a story board as it gave me a insight into how the final project will look in the end. The images below are the Illustration design of the same mood board, but this time with colour as well.


Horror poster Research and development


After finishing this project, I was tasked at advancing my skills using Illustrator. by creating the pear below, I can use these skills in the future if I ever need these types of techniques. To create the pear I first needed to create each individual object within the image below. Following a guide given by my teacher I was able to recreate the pear below.
Illustration test.
First I had to create a arrow so I chose the line tool and had drawn a line. After drawing the line, I went into the line properties to change what would be on the end of each line. At one side I had chosen the Arrow head and at the other I had chosen the arrow shaft. The arrow shaft was too small in it's default form so I had changed it's stroke size to 3.
Upon completing the arrow I then needed to cut it in half using the knife tool so that I could later place it in the pear to give off the illusion that the arrow had gone through the pear.


I then began creating the leaf, to do this I had to use the pen tool and start at the connecting point of the leaf and then click and dragged at the opposite side to give the leaf a more rounded look. I then had to draw the leaf back round to connect it to the starting point.

After creating the leaf I then started on making what was connecting the leaf to the pear and using the same technique as the leaf , I could successfully give of a rounded look to the object.
After creating the arrow, the leaf and the stem of the pear it was time to do the pear itself. Following the guide and using the techniques I have learnt before, I began creating a rounded pear. I started creating the pear at the lowest bite mark and went on from there, using the dragging technique, I could create a cartoon-ish bite mark in the pear.

After finishing the pear I had to give it some colour, so I chose to use colours from the swatches menu that were: Pear body, Pear stem and Pear leaf. I applied the colours to the specific objects that I had made.


Mood board development
After finishing the tutorial I went on to creating 3 mood boards for each film I had chosen, in order to understand the films down the basic level. I did this by looking at colours and textures, feeling and art style, and items and props used within those films. By doing this research, I can improve greatly on my final product by generating ideas in the future.

 Looking at both films I had found that a similarity of dark colours were used within the films. It may be useful to use the colours  when creating my final designs. These images usually consisted of  dark browns, blues and sometimes green. Types of colours are Taken into consideration when used in films to display a certain mood.

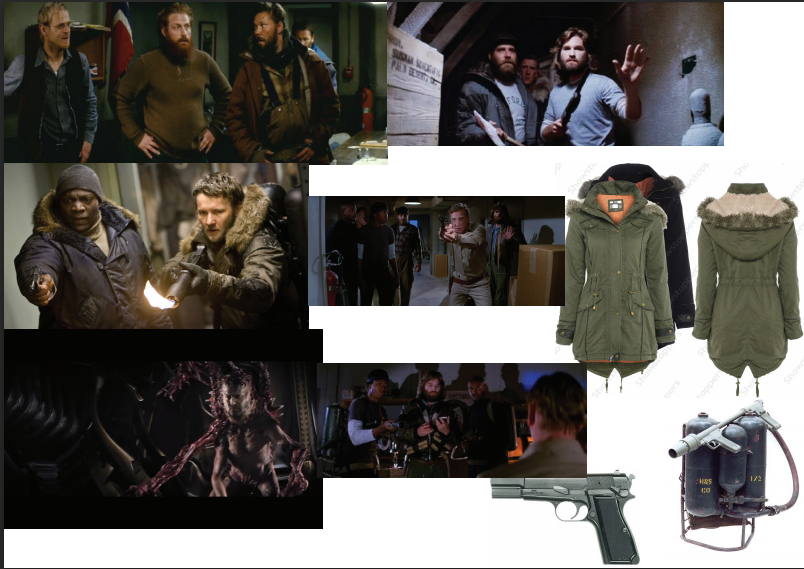
Certain locations in these films had  dramatic differences from each other, even though that they are from the same genre. This is because of the monster they try to depict from it. The thing's alien, is an alien that likes warm areas and was unfortunately frozen in an Arctic like place, which sets the seen perfectly as the alien can hide within human bodies to keep itself warm. As for 'Dawn of The Dead' the zombies are shown to roam wondrously and are shown in multiple locations throughout the film. This is shown because the creators of the film wanted to portray that no place is safe from this new horror that opposes the protagonists. This mood board can be used to generate ideas for objects used within the posters that I am going to create.


These films had a lot of props and equipment that defined the very films, as 'Dawn of The Dead' had the Assault Rifles, the jumpsuits and the helicopter and as for 'The Thing' had; wooly coats that are used to keep the characters warm, which is what the alien wants and also the iconic flamethrower used within the film.


Horror poster Research & Design
In the next project I had to create 2 movie poster designs for the horror genre using the Saul Bass design from earlier. Before I could start creating the designs I first needed to do some research into what type of typefaces worked well in horror movies and there where a lot of similar fonts, for example, the font type with blood dripping from it. Below I have collected 19 different type fonts that are inspired by horror genre. From the 19 I had picked 5 of them that I like the most with explanation on why.


After talking about why I like those typefaces, I imported them into Illustrator to edited them. I had created 25 different types, 5 of each typeface tests to see which looks the best and how I could improve on final design. To create these different types of font I had gone through Illustrators effect tab to get different effects off each font. I also tried moving letters and removing parts off letters to see if it made it more of an effective typeface.


Before creating the final pieces I had to create some thumbnail type designs for both films that I may use towards the final designs, I had chosen to create 6 designs that may be effective to use in the final 2 designs. In this photo I have chosen iconic scenes that appear within 'Dawn of the dead(1978)' as I believe those particular scenes would bring a sense of nostalgia towards those who's seen the film. 


These 6 designs are my final & prototype designs for the final product posters. Most of them feature the minimalist style design of Saul Bass and some I believe to have too much detail in them to be considered towards the Saul Bass style. Although some are like this, I have had people like them more than others, which means that they could be more effective but they do not follow the style. My best designs as shown above went through several design changes as I believed that they could be improved.


Liam Norman                                                                                                                      Liam6478.blogspot.co.uk


In unit 3 I was asked by my teacher to create horror posters in the Saul Bass minimalist style. I chose Dawn of The Dead and The Thing for my movie posters. I chose Dawn of The Dead because it was a popular movie and my knowledge of zombie films was quite large so I believe that it was an advantage to when I do my research.  I had also picked the thing because of my interest in alien movies, which motivated me in doing some research into the alien genre.

During my research I had noticed very similar visual aspects in Zombie and Alien genre horror posters. The aspects were the usage of red colouring and images of zombie like creatures in the zombie posters. I incorporated this common aspect into my posters by putting red behind my title in one poster and then changing the colour of specific words like “Hell” and “Dead” to attract the audiences’ attention on those words. For the movie ‘The Thing’ I have had a look at alien visual aspects that were common. I have found that alien film posters the colours green and black are common colours used and a ‘Martian’ is a common image across sci-fi posters. I have used these common visual aspects in my own posters by using black as a colour for not being able to see into the unknown.

To produce my poster I first had to do research into typefaces used in horror genre’s, I was able to do this by looking onto a website called ‘da font’ and had a look at several pages of horror fonts and had chosen the best ones for further research. After collect 19 typefaces I had talked about the ones that I had liked and why. I liked these fonts because of certain effects on the fonts such as scuffs or corrosion marks on it and the effect that they can give off. As a scuffed title could give off the impression that something has been worn over it meaning that there are signs of activity. After altering the typefaces with different designs I began doing research into currently existing posters and had found that on dawn of the dead poster there are zombies almost on all types of film posters. As for the movie ‘The thing’ the most common imagery is snow and a man in a jacket but it is not clear who it is, as an unknown light lights up his face. After doing my research into these two films I then decided to create a sketched version of the final design consisting of twelve ideas for each film. Three ideas from sketched went through to the final design for ‘Dawn of the Dead’ and two for ‘The Thing’.

I began with ‘Dawn of The Dead’ for my final design and started with my interview design, which portrays the opening scene to the film. It took me awhile to create a desk shape and I had to delete and restart the desk as I could not get it to shape I believed that people would understand. I originally had the desk grey with black outlines, but as this was not Saul bass design I had decided to change it to a full black fill. I then drew an oval underneath the desk to give the audience an impression that there is a light shining over the desk. After I had begun creating the characters from the film that speak at the start of the film. I had found drawing their arms very hard as they would overlap each other and cause the character to be see through. In order for me to fix this had to draw the arm on a separate layer. I then began drawing hair using the pen tool to give them more of a detailed design. This poster was later scrapped as I had drawn more posters that follow the Saul Bass design more than this one. I had kept the poster as evidence of my research and development.

I believe that my final design is effective, as I have used white space to focus people’s eyes on the slogan so that they would become more interested in the poster. This poster was later chosen as one of the 9 finals that people liked the most. People have said that the reason they had like the design was for the silhouette town and the snow, which draws you towards the slogan.

If I was to do this again I believe that I would take more time into doing the research and more time into the development of the final designs, as I believe that most of them were lacking potential. I believe that my overall grade to this unit is a pass.

Unit 01 Visual Recording

Introduction
In the first week of this unit I had been told to draw shoes in particular ways in order to show my effectiveness in those styles. This was done to also help my drawing methods within class for future projects. First, I had started off with attempting to draw a shoe with my left hand, as the is not my preferred hand, this meant that I would find it more difficult to draw objects. This was done to see how well I could cope not using my referred hand and I had found it extremely difficult to concentrate with as it was something different to how I normally and my mind had wanted me to switch to become more comfortable.
Left Hand drawing practice.

Afterwards, I tried to create a shoes in the style of anger, by using think outlines and fast strokes in the attempt to show off anger. This allows me to look into different styles and possibly use them as influence in the future. I believe this angry style could be useful in certain animations that could feature possibly intense gore. I say this as the influence came from 'The dishwasher" game, which uses angrily drawn backgrounds, dark colours and blood to make a successful game.
Angry expressive practice.
http://darkzero.co.uk/asset/2011/04/VS1.jpg


In this drawing I had to attempt to look at a different shoe for a certain time and then after a few minutes I had to hide it from my vision and attempt to draw what I saw from memory. In this experiment when I had focused on remember details about the shoe rather than a general overview, in my opinion, I had come out with a better looking shoe than my left handed drawing of a shoe.
Drawn from memory practice.
For this drawing I had to look away from the paper that I was drawing on and attempt to draw another shoe, I had focused my attention on the shoe to be able to draw an accurate attempt of a shoe. my overall finish isn't far off from what the shoe resembled apart from my drawing had missed detail and had inaccurate lines.
Looking away from paper practice.
Cloth Practice and development.
In this lesson we had to learn on how to effectively draw cloth material with shadows and creases. I had found after researching, that the best way to show depth in cloth is to use hatching and cross hatching as it has shown to be effecting in my drawings. At first hand I was not used to the cross hand shading effect so I had tried drawing shadows how I normally draw them in this first image.
For my second attempt at drawing the cloth I took into consideration the hatching and cross hatching techniques that my teacher had shown me. I believe that this image was a better attempt than my first image as I had managed to show some depth into my drawing and was able to efficiently draw shadow into the cloth.

1 Point & 2 Point perspectives
During the start of Unit 1 I had begun practicing 1 and 2 point perspective. I had found it quite hard to do 1 point perspective without a ruler as drawing for me in straight line is very hard, but I had found that doing 2 point perspective was easier as I had done it before. I first did some research on 1 point and 2 point perspective and had found Da Vinci's art that had used a lot of 1 point perspective. Looking at several one point perspective I tried to integrate the techniques into my own work and had found that with more development my technique became better with each image I attempted to create.

http://udel.edu/~davebrin/1481
adorationmagi_davinci_drawing.jpg
https://amosharrafa14.files.wordpress.com/2010/09/
1-point-perspective-resource-21.jpg


I then attempted to draw a vending machine in one point perspective in order to further my skills in one point perspective. This did not come out as expected as it does not follow the 1 point perspective rule, as I hoped it would. for me to improve it I would have to take some consideration into the placement of the objects inside the vending machine.
In this picture I was asked to do a one point perspective of one of the college hallways, in able to practice one point perspective. For this attempt I had improve slightly for the 1 point rule as I kept trying to practice this image until it had followed the 1 point rule.  For me to improve this image I would have to improve the amount of detail within the image.
I was then asked to draw a kitchen from one point perspective. I had found this very hard, as I still had not grasp the concept of one point perspective. In order  for me to further my skills I will need to practice as home.

When looking at 2 point perspective I had a look at previously made designs that had used the style like Edward Hopper's night hawks image and Mies van der Rohe Design Friedrichstrasse. looking at these two images I can see how the 2 point perspective was used, especially in 'Mies van der rohe design', as the perspecive lines become clear as you look at the top of the building.


https://i0.wp.com/upload.wikimedia.org/wikipedia/commons/a/a8/Nighthawks_by_Edward_Hopper_1942.jpg
http://bauhaus-online.de/files/imagecache/480h/bilder/088_3_hochhaus_friedrichstrasse_1_0.jpg

I then went on to try 2 point perspective, which I had found easier, because I have had practice with 2 point perspective before. I was asked to also use shades and apply shadows to the image as well, to show my understanding of it.

Drawing objects.
In this lesson I attempted to draw real life objects to the scale of the piece of paper. This lesson was made to improve my scale of object, in order to make sure that my work would look surreal in the future.
I attempted it again using new techniques to see if I could improve the look of the objects. I believe that my skill drawing these objects using the technique had improved the realism of the picture.
I then attempted to do this again but at a different angle and with different objects to further improve my drawing skill.
In the drawing I used charcoal in a attempt to get a different style on how things looked within the picture. I believe that using charcoal gave off a sharper picture overall. 
In this lesson I had to draw multiple objects that were on top of each other and then colour the background, in able to give more attention to the background detail than the actual objects.

When I had finished the shading it looked like this.

Human practice & development
For this lesson I was being taught on construction lines and how to draw heads efficiently. At first I had done some research into current existing art of the human form and found lots of work by Jamie Hewlett and Eddie Smith to be inspiring work.

http://i01.i.aliimg.com/wsphoto/v1/1827586825/P0
424-Gorillaz-Noodle-Murdoch-Russell-Thec-Band-Musi
c-Background-art-poster-24x32-inch.jpg_220x220.jpg


At first I were told to try and draw the person sitting opposite of us using construction lines, in order for us to show to the teacher of what our current ability is. I had found drawing a person quite hard, as I am not used to drawing realistic human characters. Using construction lines helped me understand where to draw specific parts of the human face.

Afterwards I tried to practice this technique in order to improve my drawing of the human face. I had found using this technique to make a massive improvement to how I would draw character possibly for concept art. For me to continue using this would help me improve my overall work.

I had attempted to practice this even more by trying different positions the head would be in. They did not come out very well, but with more practice I believe that I could improve it to a professional standard.

Wireframes
In this lesson we were shown that the best way to draw a body is to first draw a wireframe and then go over afterwards. I had tried several attempts at creating a wireframe, with some that involve props and some that have box limbs. This was to experiment with different styles and shapes of the human body.
Stickman Warrick


I then began drawing people who are sitting on objects, which would allow me to get a different perspective into how bones work within a person.
At this point I tried to create boxes to the characters instead of using lines as this will allow me to build a body from the template. After further experimenting I then attempted to try the continuous line drawing, which required me to not take my pencil off the page after starting. This style appears to have come out better than I had first expected as I had not had high expectation for how the image would turn out, but I had managed to draw two people using this style.


Proposal for concept art
For my concept art unit I need to create my own story and then create concept art based on that story. My story is based in a neo-tokyo dystopian city, which is set in the future with technology far advanced than our own in the 21st century. In the city the poor live underground, whilst the rich live in luxurious hotels above ground. Currency, delivery, transportation and entertainment has all become digital allowing for a faster life for all, although does come with side effects for those who cannot live without it. 'The Underground' is where all people band together in order to survive against the submission from the rich. Meanwhile those who are rich live in 'The Neus'.

Yukimura is a young man at 18 years old who grew up in 'The Underground' for all his life and does not know what goes on above. Yukimura spends his time helping those who needs it most and is carefree to what happens in 'The Underground'. Yukimura has aspirations to make 'The Underground' a better place for all those that live there. He wears clothes similar to that of 'hybrid punks gang', although he is not a member of it. This causes people to be nervous, when he is around.

Cypher is a woman that is 21 years old. She does not know her real name and was made orphan at the age of birth because her family couldn't look after her. She was taken in by the local rebellion group known as, 'Transfix'. She is part of the rebellion against the government that controls the city above ground. She has an inability to trust strangers and friends due to the campaign, this has an effect on Yukimura who becomes often confused by her strange actions.

The mood boards I have designed follow the cyberpunk style that I had been going with and have shown to be huge help towards my character making and environment design, as they have continued to inspire me into what I wanted to turn my story into. This has allowed me to come up with ideas I may not have thought of if I did not have them.

This was first design into how the scenery may look in the final piece that I had been working on. For this image I had tried to use a focus point for the lower half that shows the underground city and then in the middle you can see the floorboards and above that is the above floor city that is meant to show where the posh and rich live. I was trying to give off a world of separation in the image that could show that there's a difference above and below floor.
After finishing my first location design I went onto creating character concepts that may be useful for the final design. For this character I wanted to achieve a rebel type character with long scruffy hair and who was also a female. I wanted to have a strong personality for this female character as, I wanted her to be the most liked character, out of the two characters I have made.

After creating the character, I had decided to create location art for the above city, if I decide to change the location of where I would do the final piece. For the above city I wanted to make it look more expensive than 'The Underground' to give it a rich and posh look to it, I had attempted this by putting advertisements over the buildings to make it look like people do lots of shopping here.

I then tried to create a prototype for how the main character will look in the final drawing. I had found the first image on the left to be a failure, as the body structure does not match up to what a real human would look like, so I had to retry this with a different angle, which had appeared to come out better than the first design. Using construction lines I was able to create a character whose body was almost realistic to an actual humans.

This is the final drawing for the project that I had been working on, I believe it to match the mood boards, as I have been aiming for. This allows me to be continually inspired into how I want it to look if I make any sudden changes to it.
This style of drawing, for me, had been heavily inspired by Steven Lisberger's Tron and Timesplitters 2 Neo-Tokyo level, which itself was inspired by Ridley Scott's 'Bladerunner'.
http://imageserver.moviepilot.com
/grid_concept_art-why-tron-3-is-going-to-be-
amazing.jpeg?width=1500&height=809
http://img2.wikia.nocookie.net/__cb20080804094837/timesplitters/images
/0/06/Neotokyo.jpg


After finishing the main prototype of the final drawing, I uploaded it into Photoshop and began editing it using the tools that Photoshop has.


This is the finished piece after I had put it through photoshop. This image is supposed to show a preview into how 'The Underground' looks. The image shows a conversation between Yukimura and Cypher as they are surrounded by bright lights. I tried to give the feeling of dark and shanty, whilst also using neon lights to light up the area.
Concept of 'The Underground'


In this image I tried to show what the above area looks like, after some planning I had come up with a name for it, which is 'The Neus'. For this area I tried to give off the feeling that only those with lots of money and high class standing would be able to walk around this consumerism area. I feel like the adverts on the walls show off this.
2nd concept of 'The Neus'


In this image I wanted to create something that showed off the intro to the story. Unfortunately due to timing I had felt like this one was more rushed than my other ones. I had attempted to make it look like a warehouse as my story had said so.
3rd Concept to the prologue of the story that I have created.


15/12/2014 evaluation
In this unit I was asked to create a story of my own. Along the way I had learned new techniques in the lessons that I had, this would allow me to create concept art from. Using different techniques I would be able to show my progress within the unit. For my concept I choose it to be in the future where technology has far ascended of that our own. My concept had been heavily inspired by childhood entertainment that I had watched, such as, Timesplitters or Tron. These inspirations have allowed me to build on a base my idea that I had created.

I began approaching this task by learning Different techniques, such as, wire framing, human practice, 3D objects and perspective. This would allow me to take techniques into account when creating my concept art designs. Perspective have been used in most of my designs, as I feel they help me create buildings easier than if I attempted to create some without them. After learning these techniques I began compiling mood boards of locations and characters that were currently relevant to my idea, which was cyber punk. These mood boards had proven to be extremely useful to me, as I referred to them several times along the way of creating these designs, which had allowed me to create and rethink drawings I made along the way. After finishing the final design I imported them into photoshop and began editing them, as the videos above show.

To produce my outcome I needed a clear understanding of the subject I would base it around, so I had to do some research around the cyber punk style. I had found that in the cyber punk style, neon colours circuitry and long leather or long cloth clothing wear common items that are shown within the style. When looking at locations that are part of the style I had found the futuristic dystopian worlds were the most common thing to find when looking at artwork. using the mood boards that I had created I had been able to look at these common things and implement some of them into my own work.

I believe that my work was successful because of the amount of development that went into the final designs. Because they had stayed true to my original intent of the cyber punk world, even though I had gone through several changes along the way. Comparing it against those mood boards I can see the similarities, so it is how I want it to be. Looking at the assignment brief I have successfully been able to create characters, backgrounds, locations and story that is visible to someone who would look at it the first time.

At first I had found character design and idea mind mapping difficult, as I was working with no research and minimal ideas, but as time went on I was able to expand on my ideas and begin to build a strong project, which had 2 main characters and several locations. When I got to editing the images in photoshop, I had found doing that hard, as I am not used to using photoshop as an editing tool and I do not know all of the tools and techniques available to me.

If I were to do this unit again I would change a few things that I have done, like I would spend more time into researching photoshop techniques and more uses of photoshop. I would spend more time into character develop the includes clothing and personality, as this time I had to rush clothing design due to time and accessibility I had to photoshop at the time. I feel like my work is not up to standard when compared against most professionals, so I would have to look into how to improve my current work.